How to Install a Water Softener: Step-by-Step Guide
Introduction to Water Softener Installation
A water softener is an essential appliance for homes with hard water, which contains high levels of minerals like calcium and magnesium. Installing a water softener can protect your plumbing system, improve appliance efficiency, extend the life of your water heater, and make cleaning easier with less soap scum and mineral buildup.
While professional installation is always an option, many homeowners can successfully install a water softener themselves with the right tools, preparation, and guidance. This comprehensive guide will walk you through the entire process from planning to post-installation maintenance.
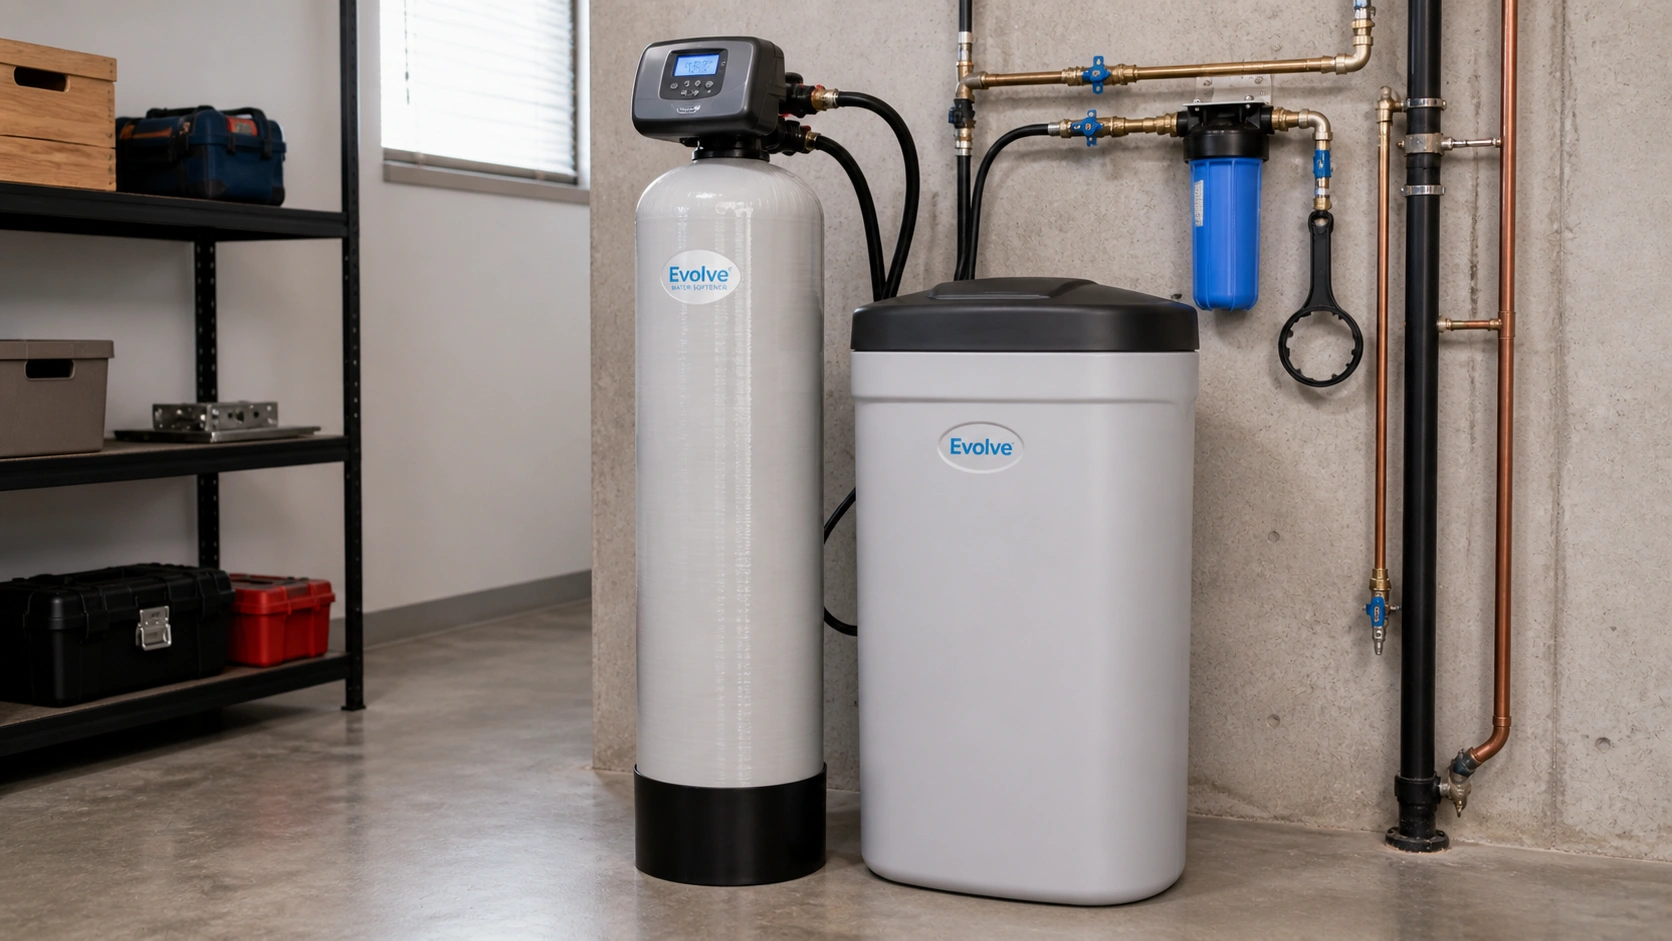
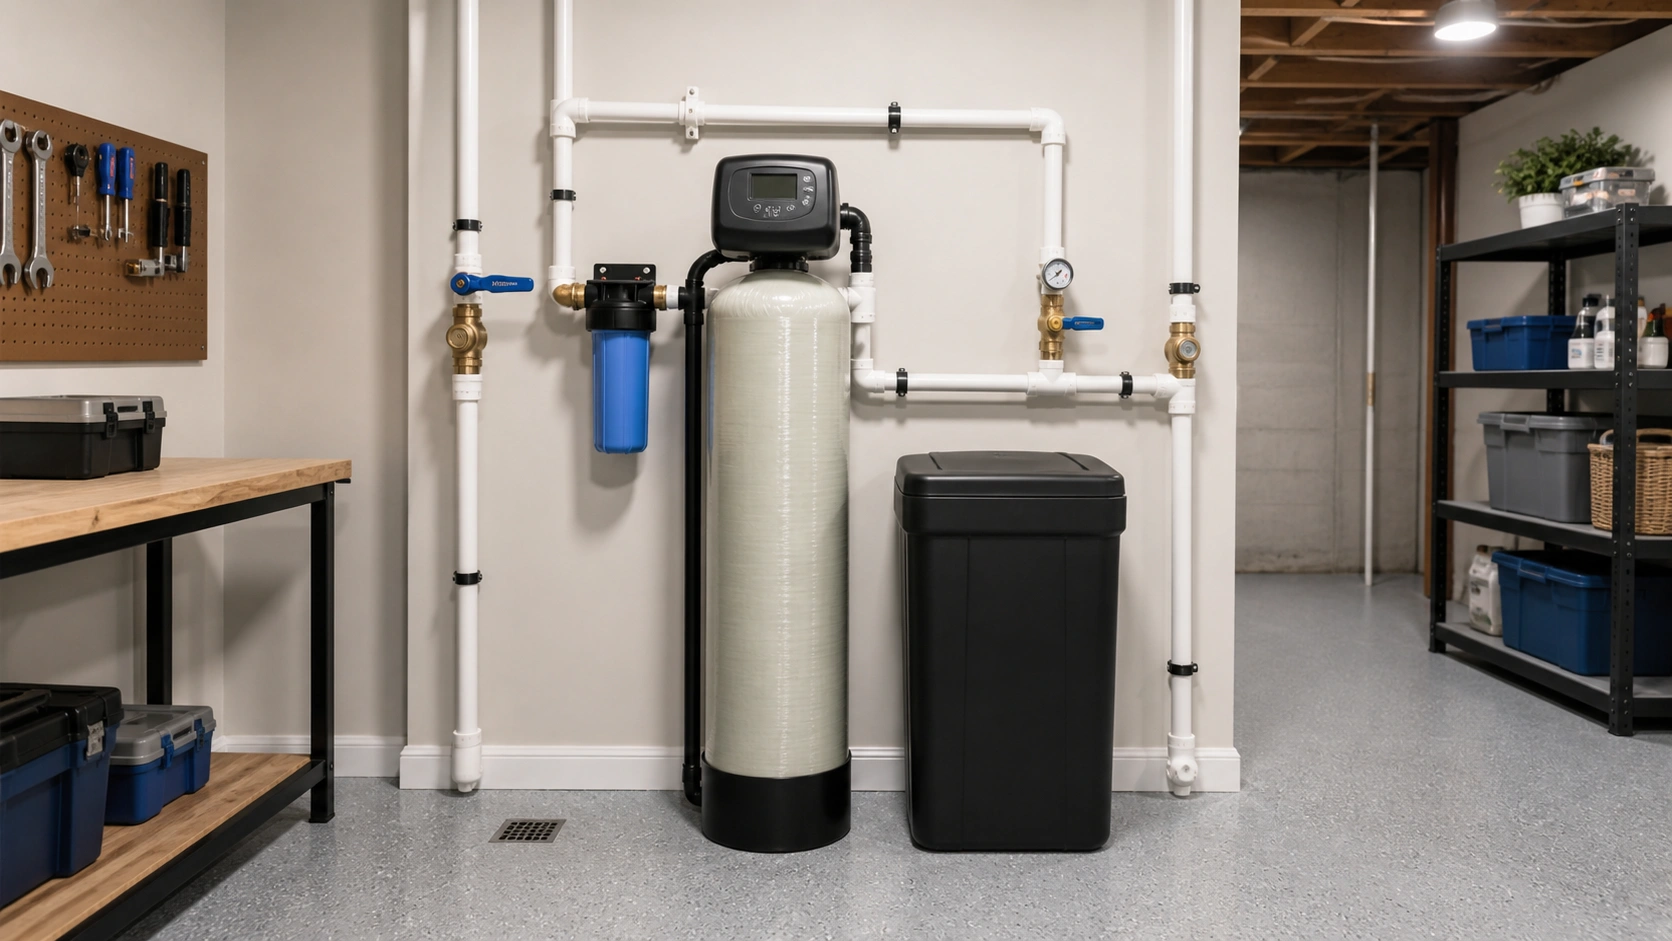
A typical whole-house water softener system that can be installed by homeowners with basic plumbing skills
Preparation Before Installation
Choosing the Right Location
Selecting the proper location for your water softener is crucial for both performance and maintenance:
- Install as close as possible to where the main water line enters your home
- Choose a level, stable surface that can support the weight (a full system can weigh over 300 pounds)
- Ensure there's access to a drain for the regeneration process
- Place near an electrical outlet if your model requires power
- Select an area protected from freezing temperatures
- Allow sufficient space for maintenance and salt replenishment
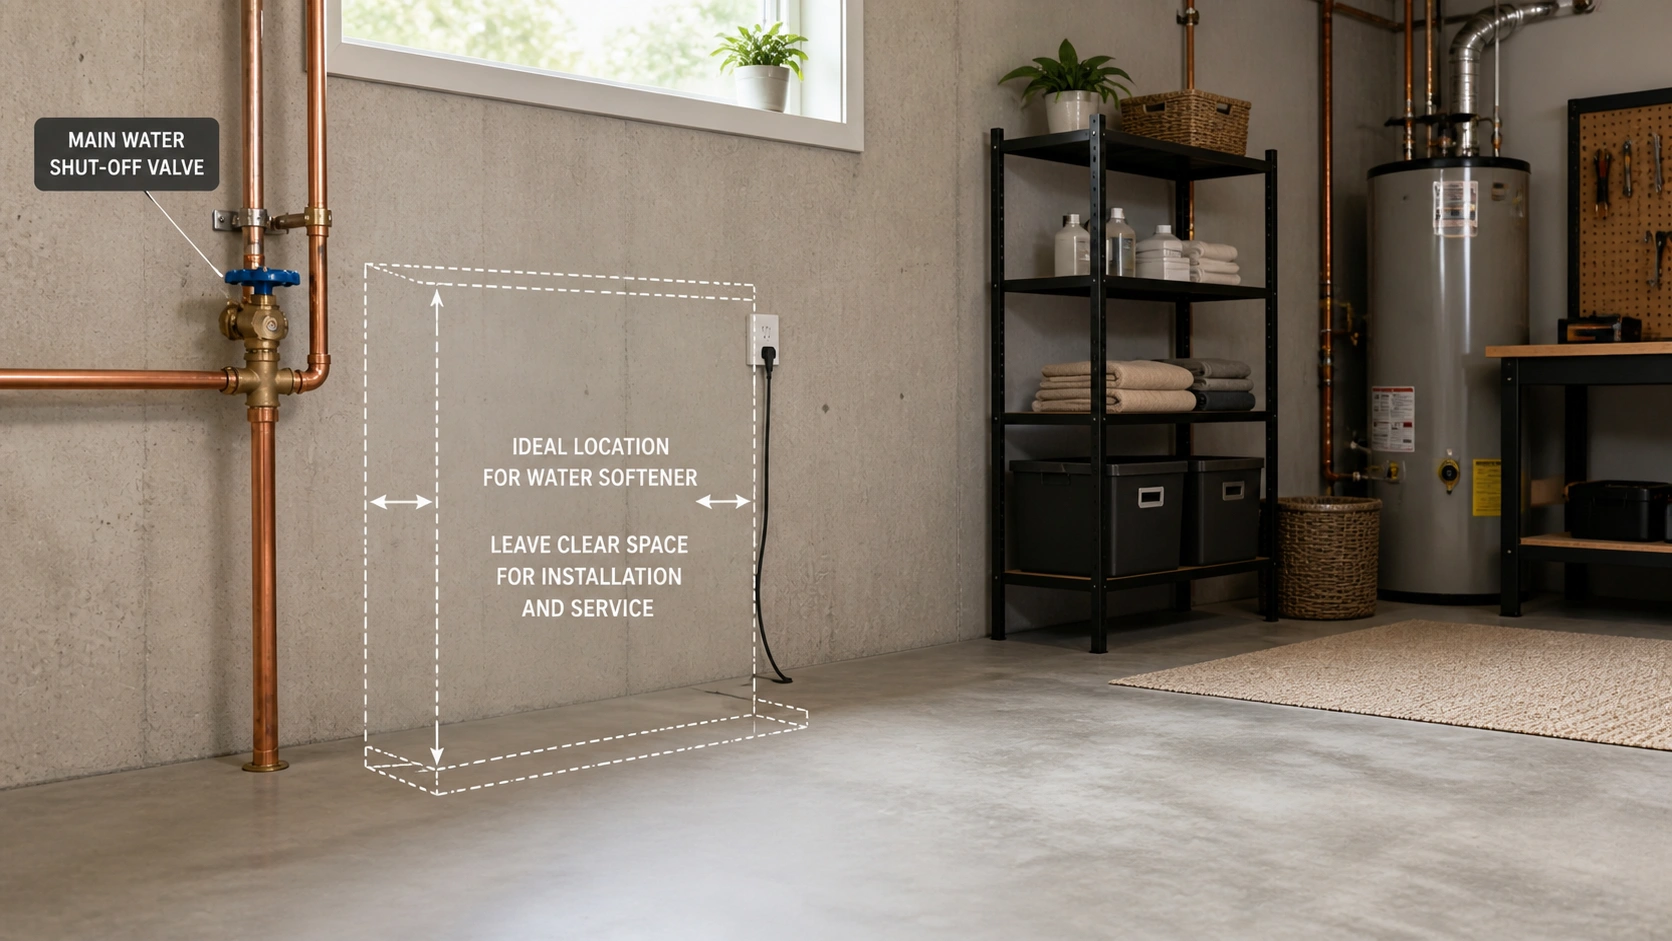
The ideal location for a water softener is close to where the main water line enters your home
Tools and Materials Needed
Gather these essential tools before beginning your installation:
- Pipe cutter or hacksaw
- Adjustable wrenches
- Pipe wrench
- Teflon tape or pipe thread sealant
- Soldering equipment (for copper pipes) or PVC cement (for plastic pipes)
- Bypass valve (often included with the softener)
- Drain hose or tubing
- Bucket and towels for any spills
- Safety glasses and gloves
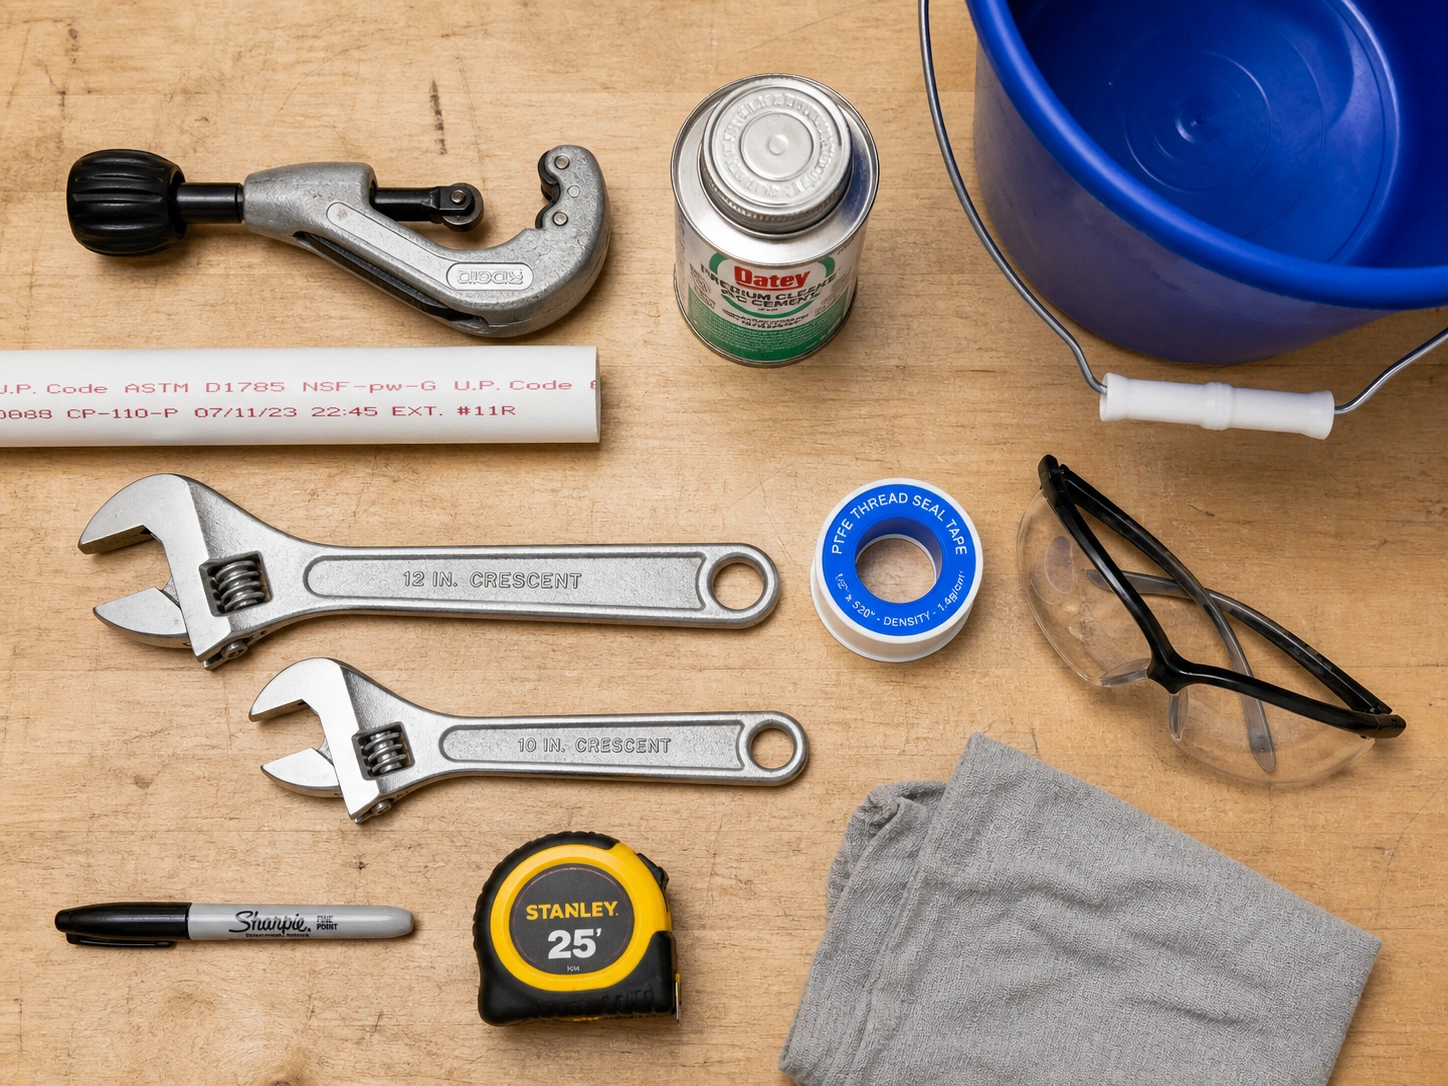
Essential tools and pipe fittings required for a successful water softener installation
Sizing Your Water Softener
Choosing the right size water softener is essential for optimal performance:
- Calculate your household's daily water usage (average is 75-100 gallons per person daily)
- Test your water hardness (available through test kits or local water reports)
- Determine the grain capacity needed based on hardness and daily usage
- Consider future changes in household size or water usage patterns
Step-by-Step Installation Process
Step 1: Turn Off Water and Electricity
Begin by shutting off the main water supply to your home. Open a faucet at the lowest point in your home to drain any remaining water from the pipes. If your water softener requires electricity, turn off power at the circuit breaker.
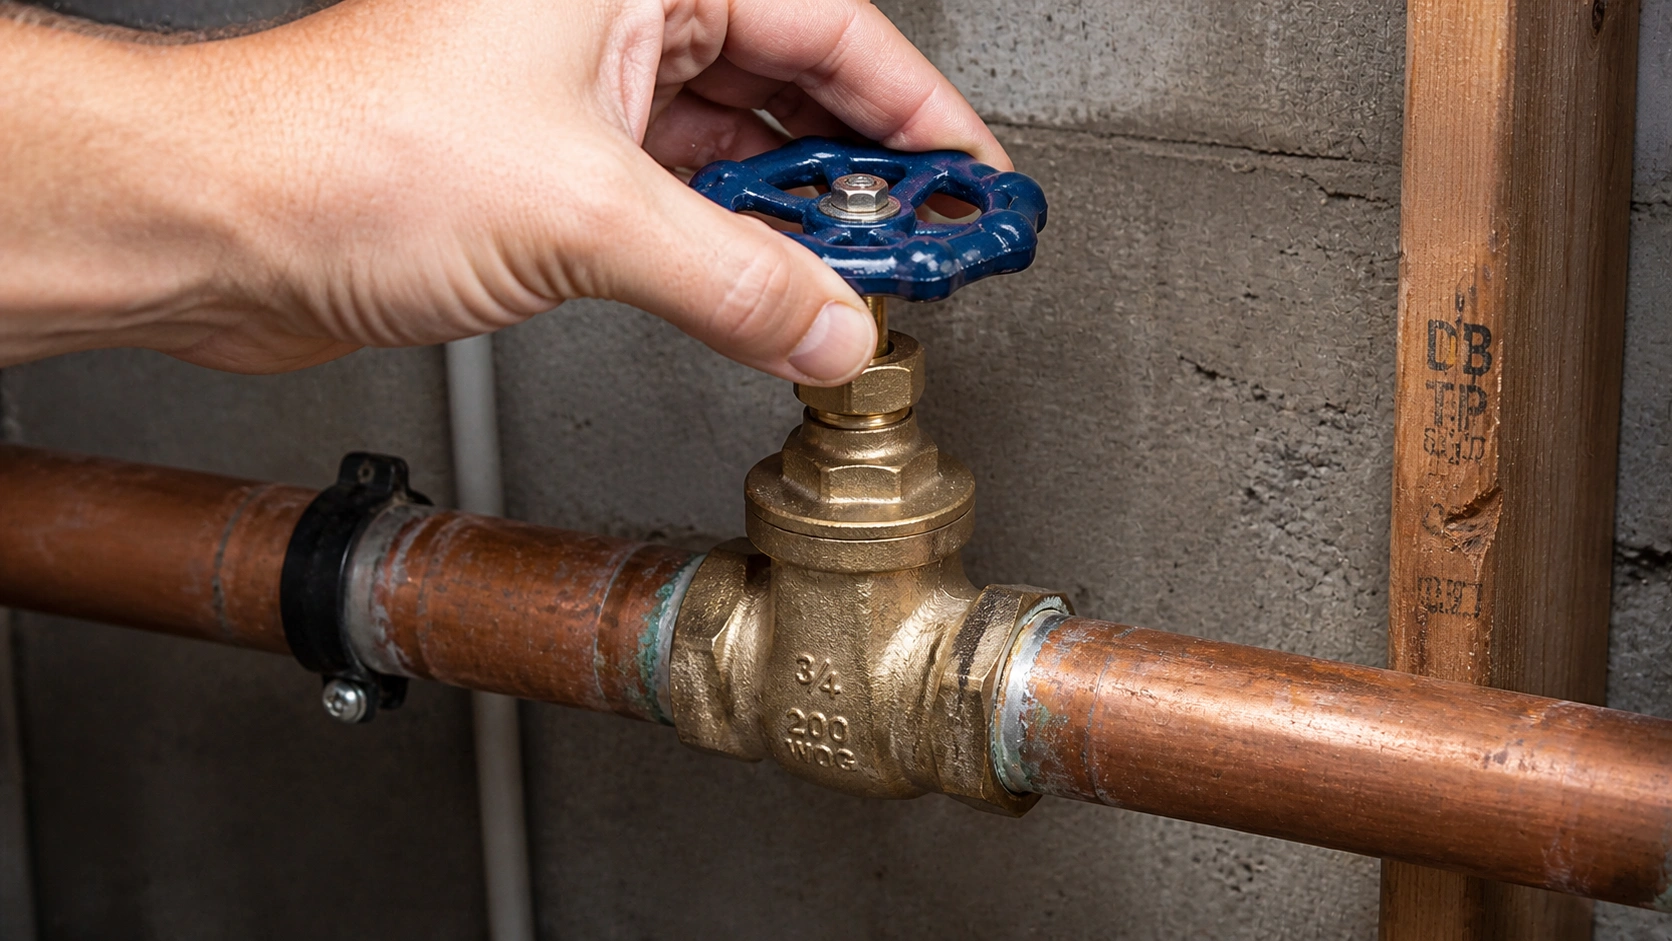
Always turn off the main water supply before beginning installation work
Step 2: Install the Bypass Valve
Most water softeners come with a bypass valve that allows you to temporarily route water around the unit for maintenance or repairs. Install this according to the manufacturer's instructions before connecting the main pipes.
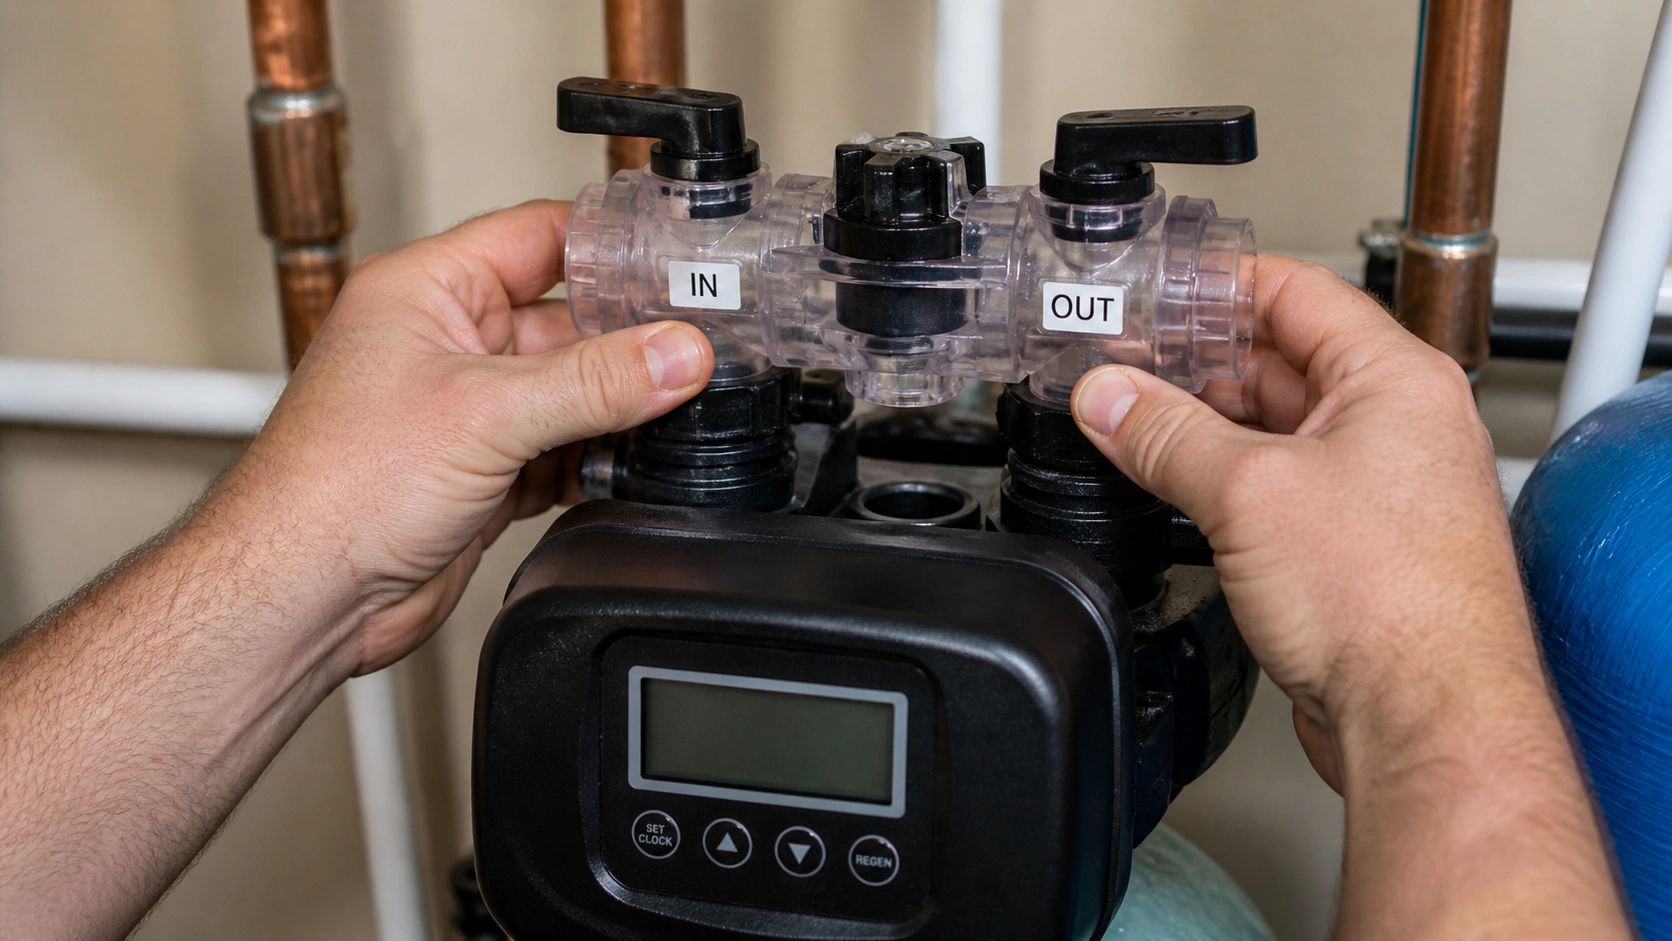
The bypass valve allows water to flow around the softener during maintenance
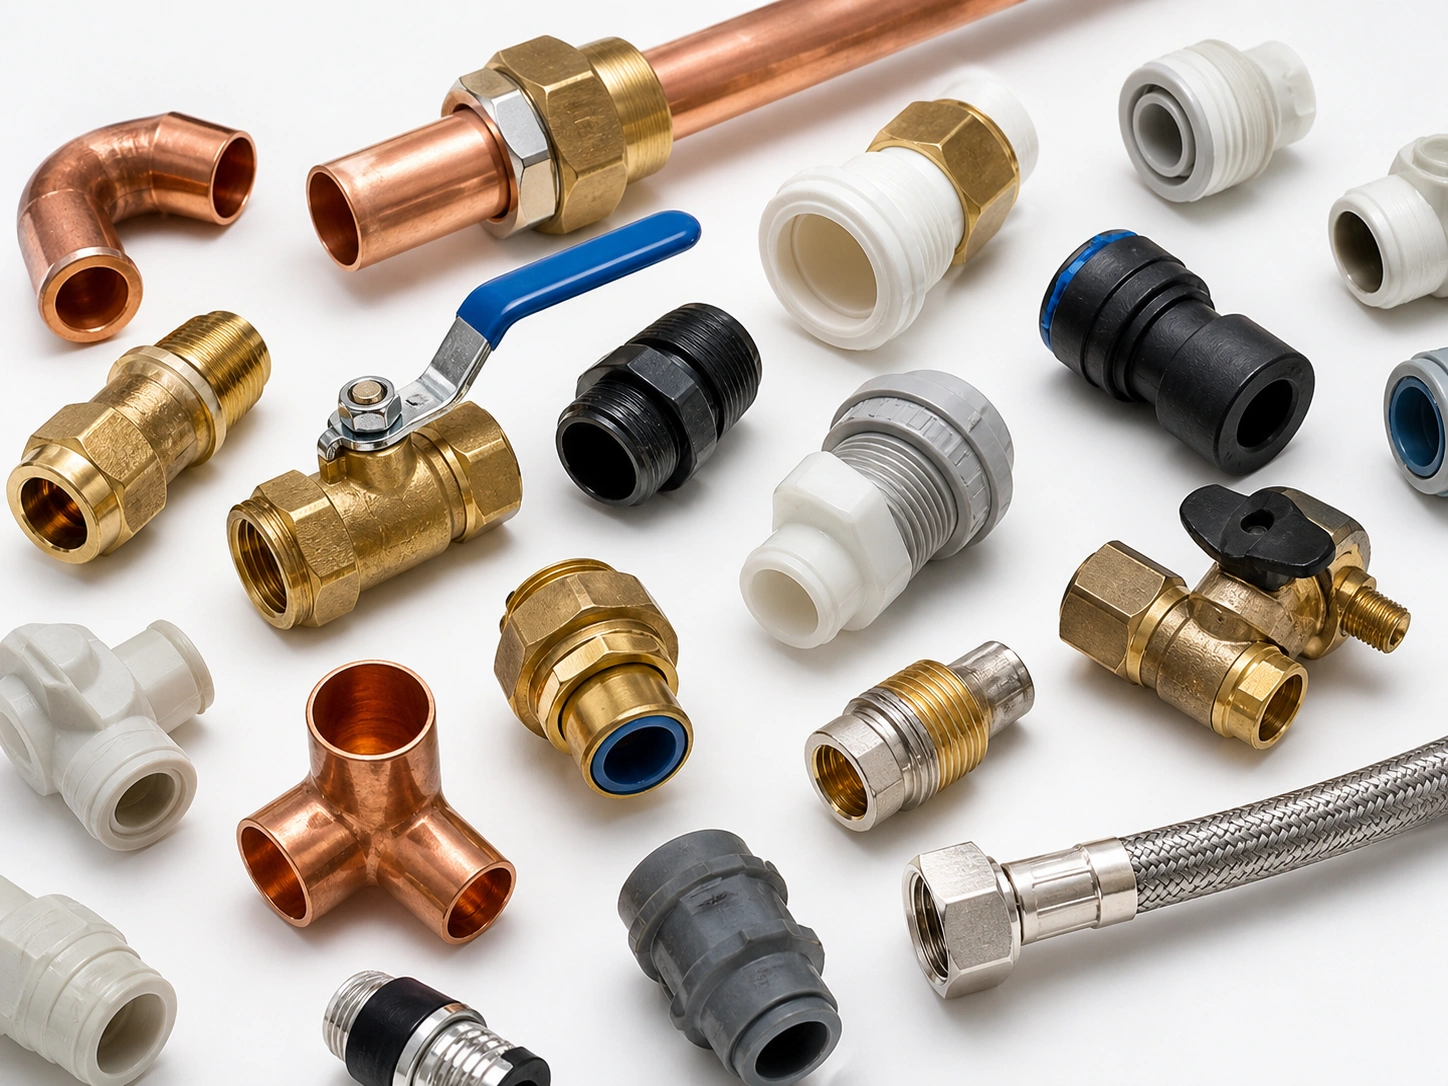
Step 3: Connect the Inlet and Outlet Pipes
Identify the inlet (where water enters) and outlet (where softened water exits) ports on your softener. Connect the main water supply line to the inlet port and the house plumbing to the outlet port. Use appropriate fittings for your pipe material (copper, CPVC, or PEX).
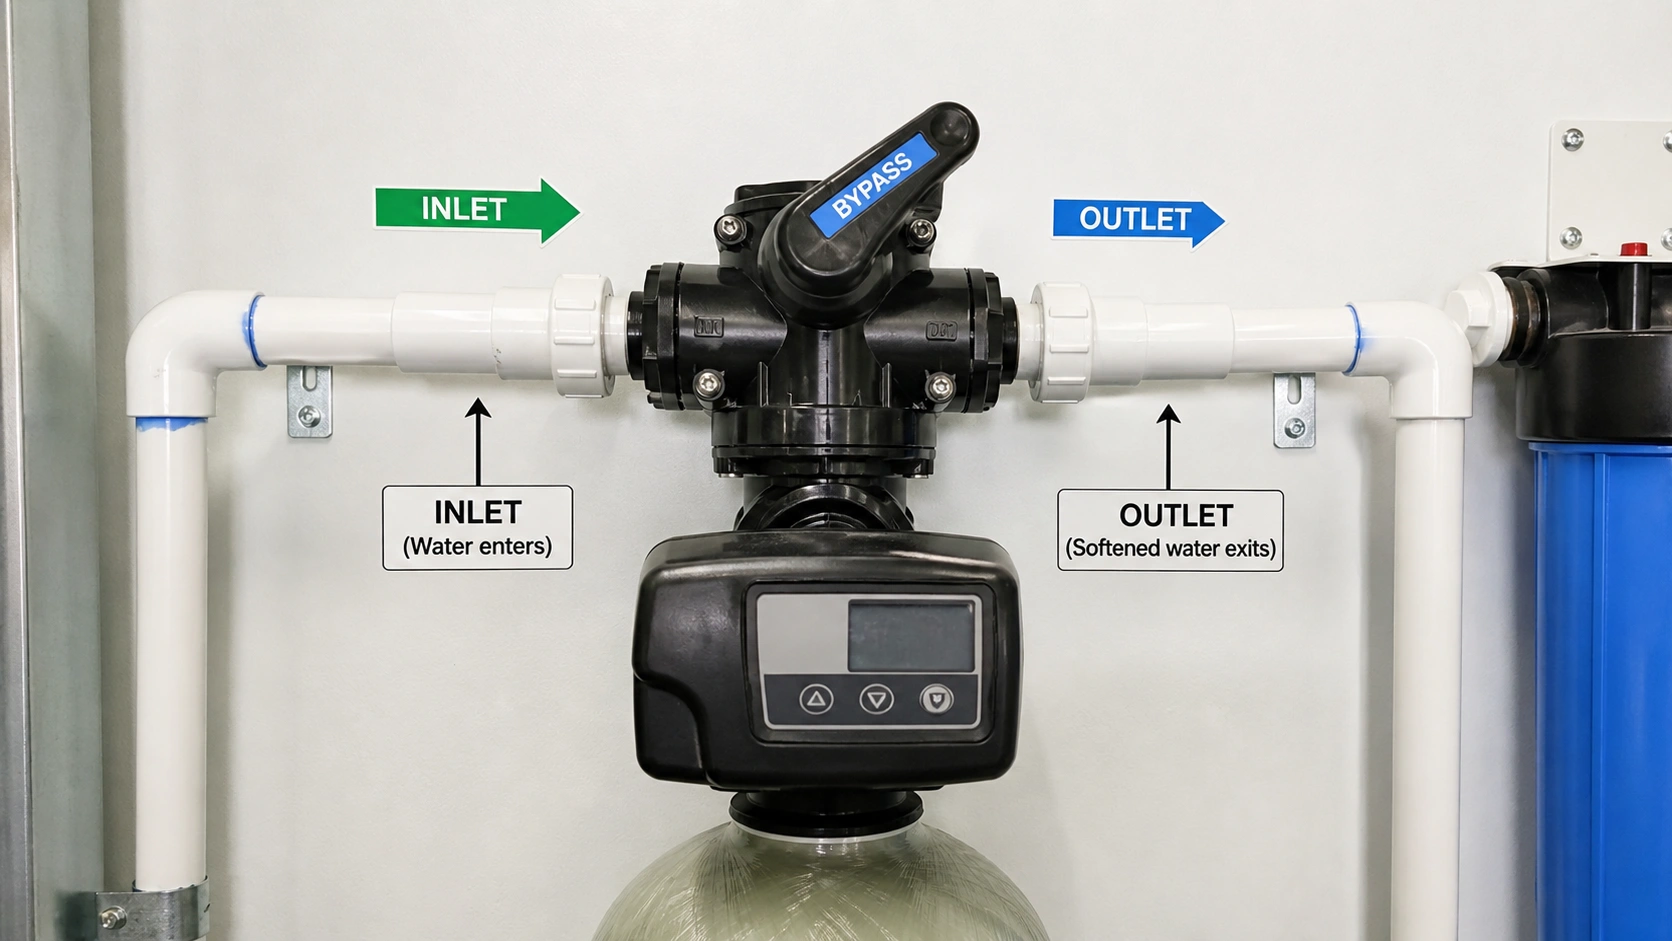
Proper connection of inlet and outlet pipes is crucial for system operation
Step 4: Attach the Drain Line
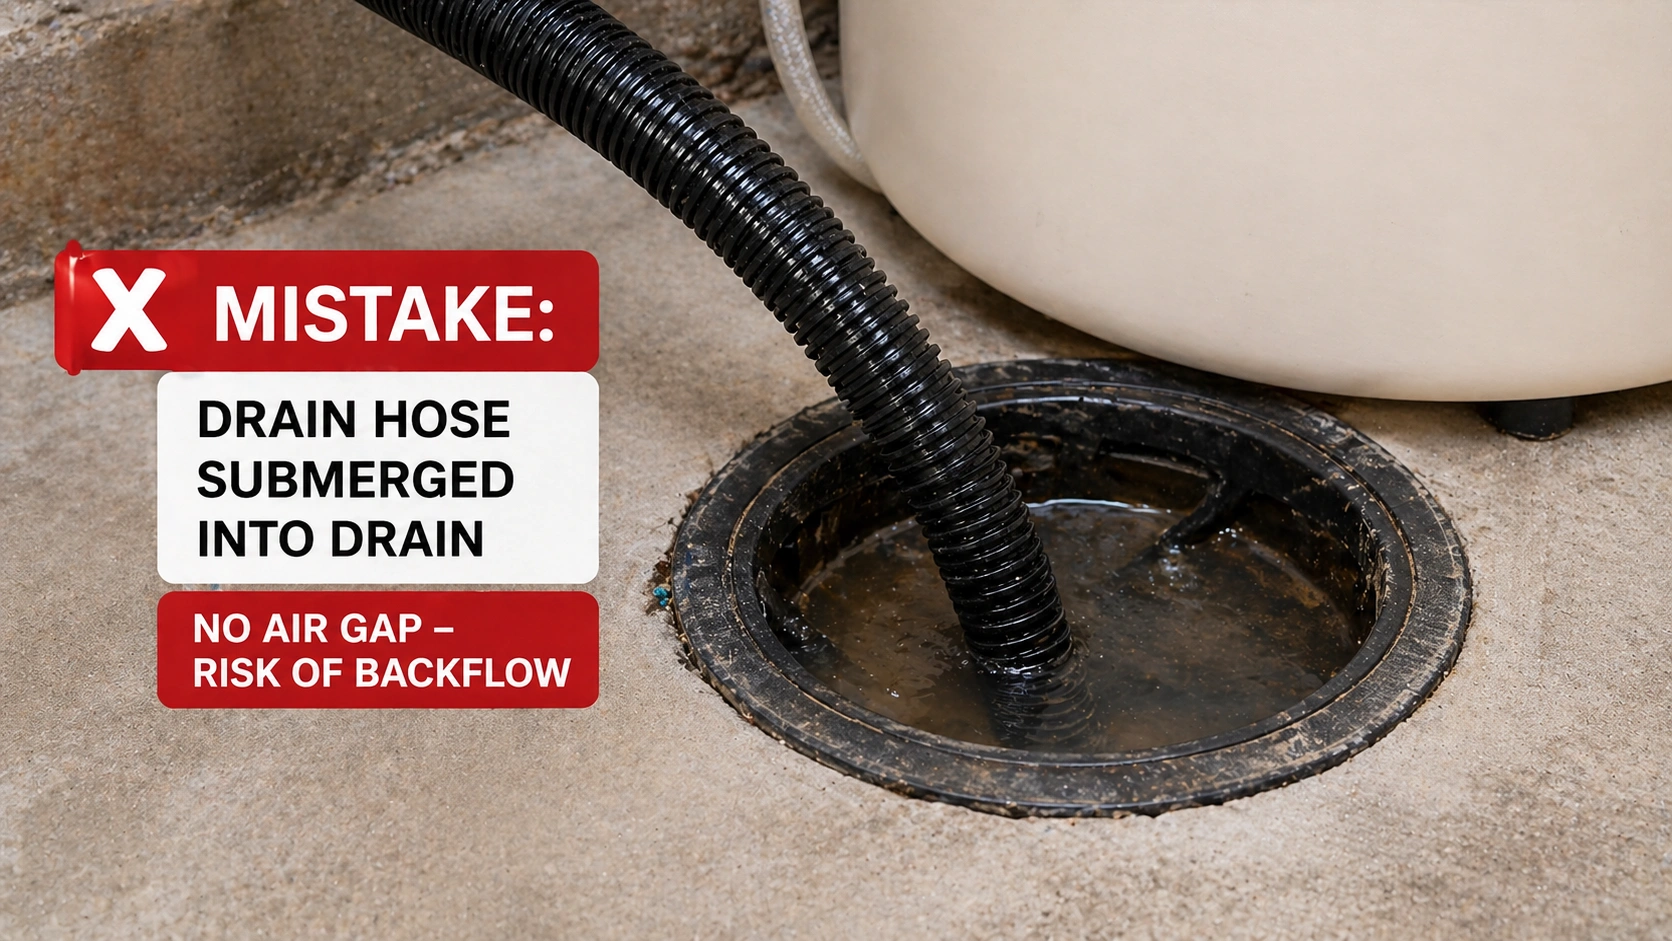
Connect the drain line to the softener's drain port. Run this line to a floor drain, utility sink, or standpipe. Maintain an air gap (usually 1.5-2 inches) between the drain line and the drain receptacle to prevent backflow. Secure the line and avoid kinks or sharp bends.
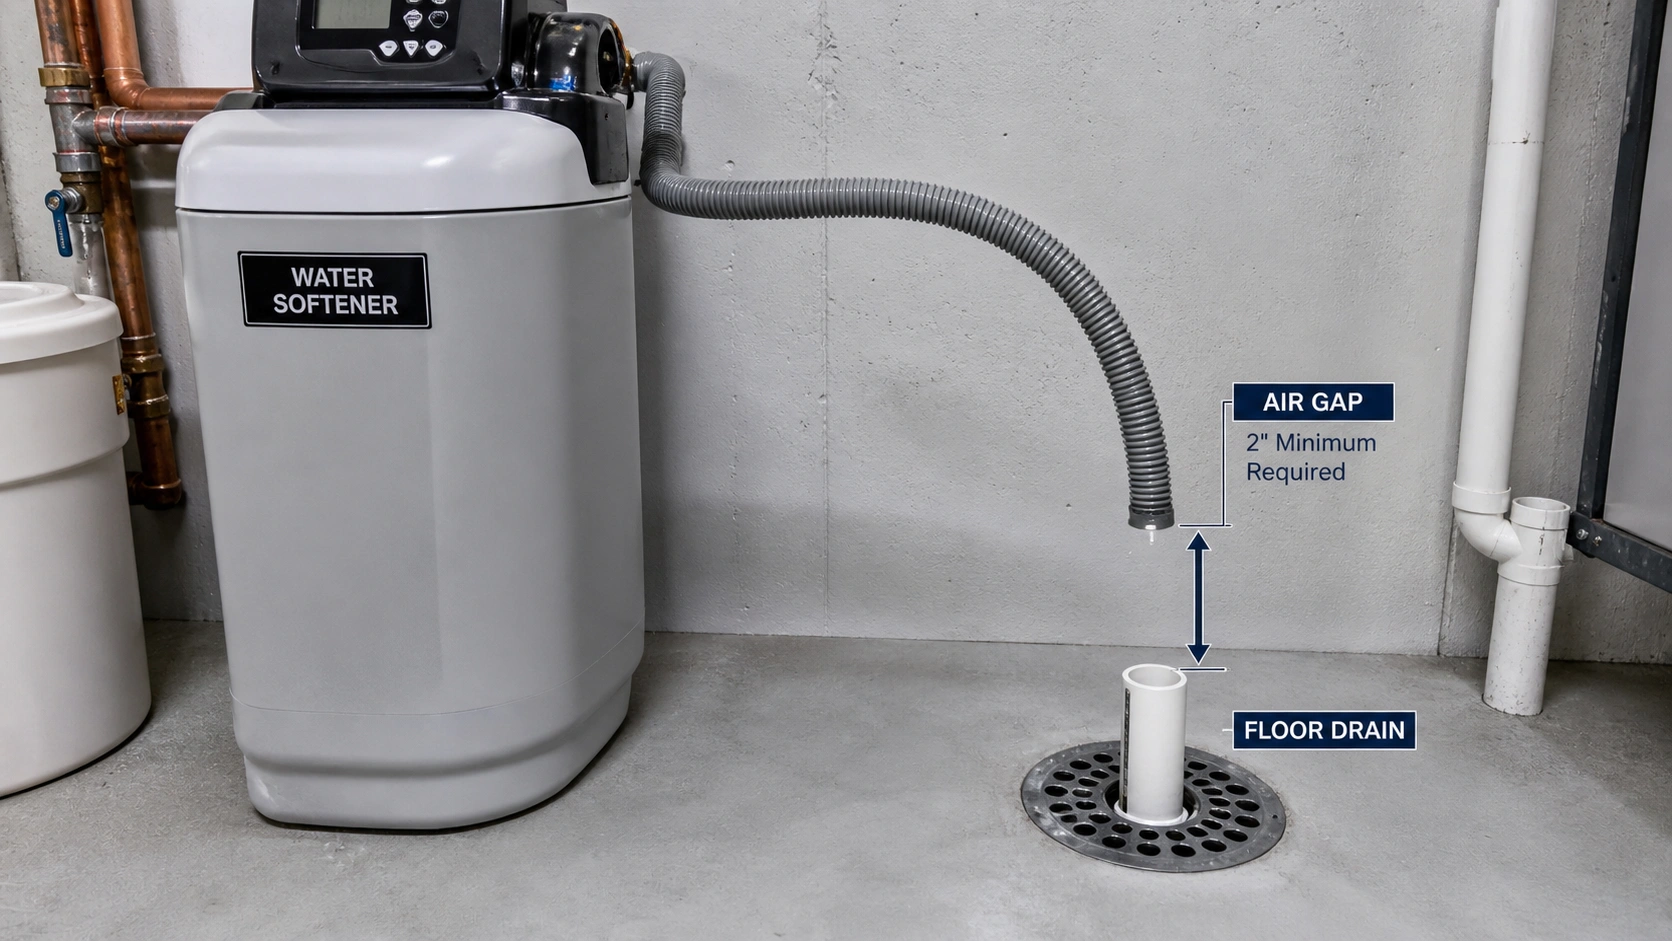
The drain line must have an air gap to prevent backflow during regeneration
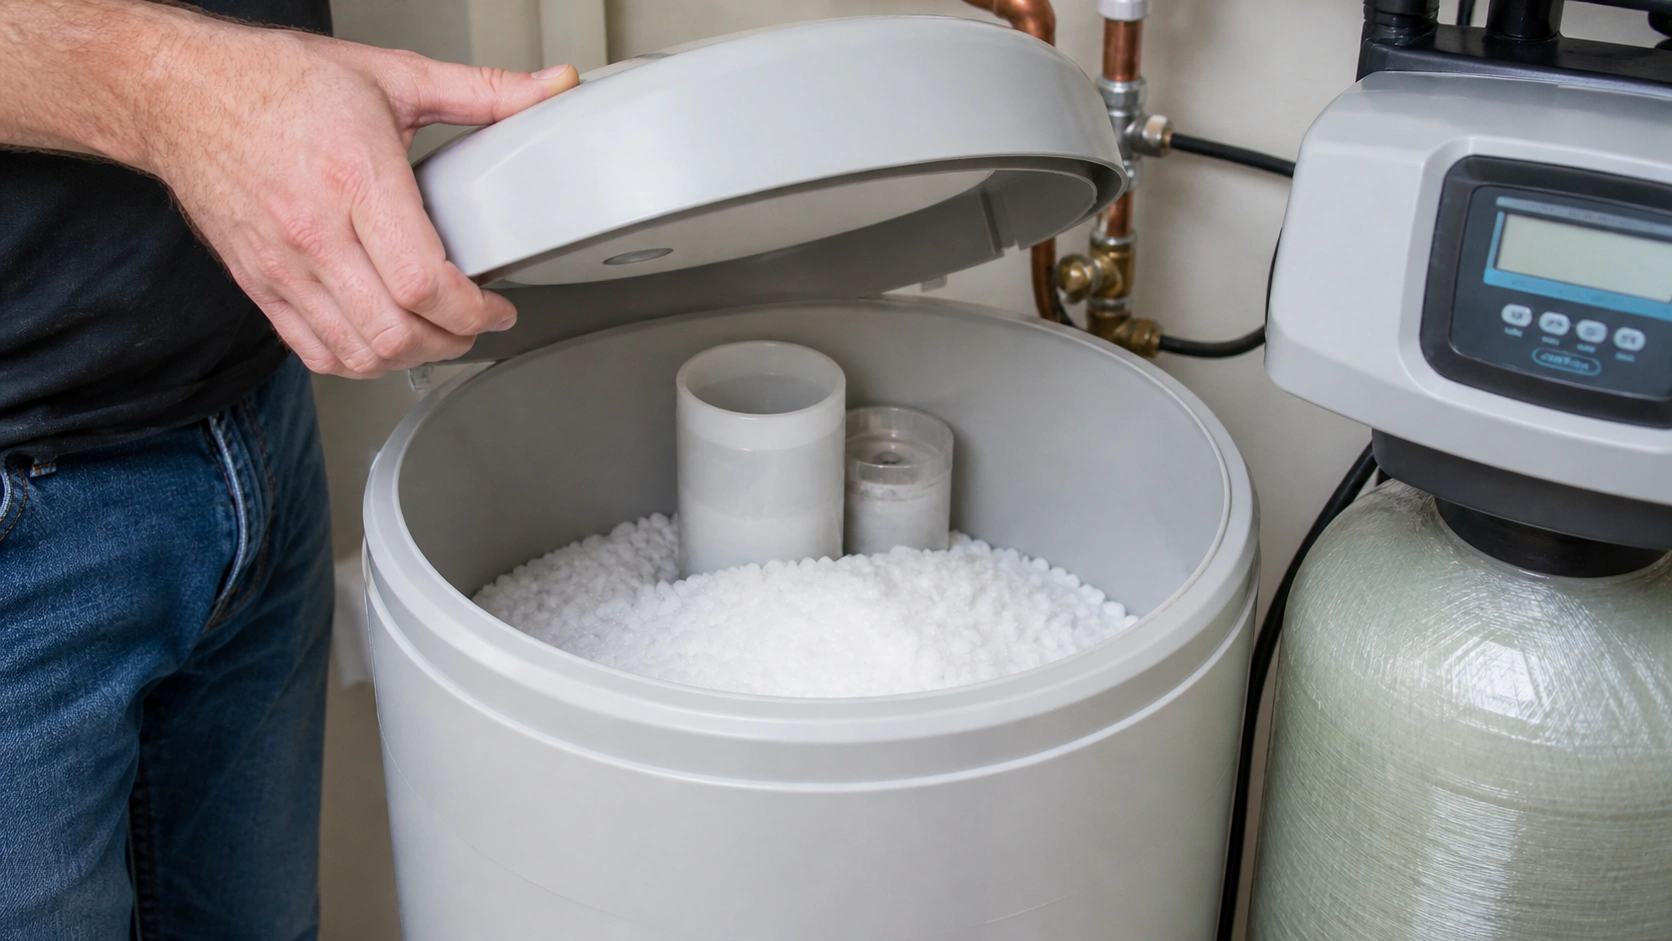
Step 5: Add Resin and Salt
Most units come pre-filled with resin beads. If yours doesn't, carefully add the recommended amount to the mineral tank. Fill the brine tank with the appropriate type and amount of water softener salt, following manufacturer guidelines.

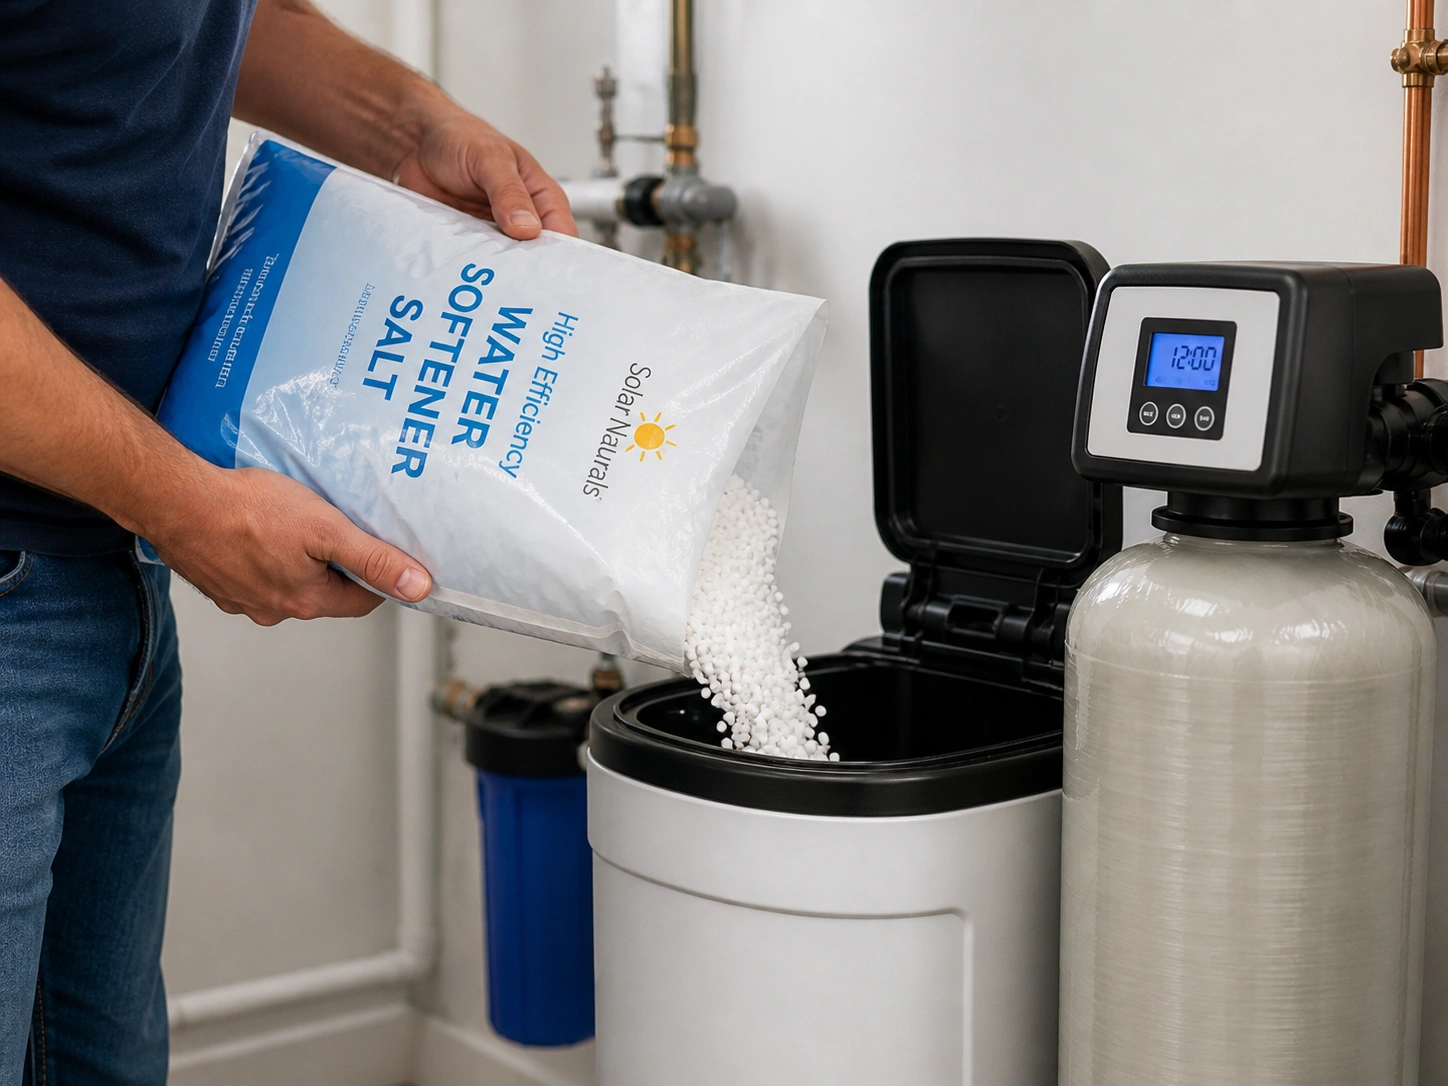
Resin beads (left) are the heart of the softening process, while salt in the brine tank (right) regenerates the resin
Step 6: Restore Water and Power
Slowly turn the main water supply back on to allow the system to fill gradually. Open a cold water faucet somewhere in the house to bleed air from the lines. Once water flows steadily, turn on the power to the softener if it's an electric model.
Step 7: Program and Test the System
Program your water softener according to the manufacturer's instructions, setting the time, hardness level, and regeneration schedule. Initiate a manual regeneration cycle to test the system and check for leaks during each phase.
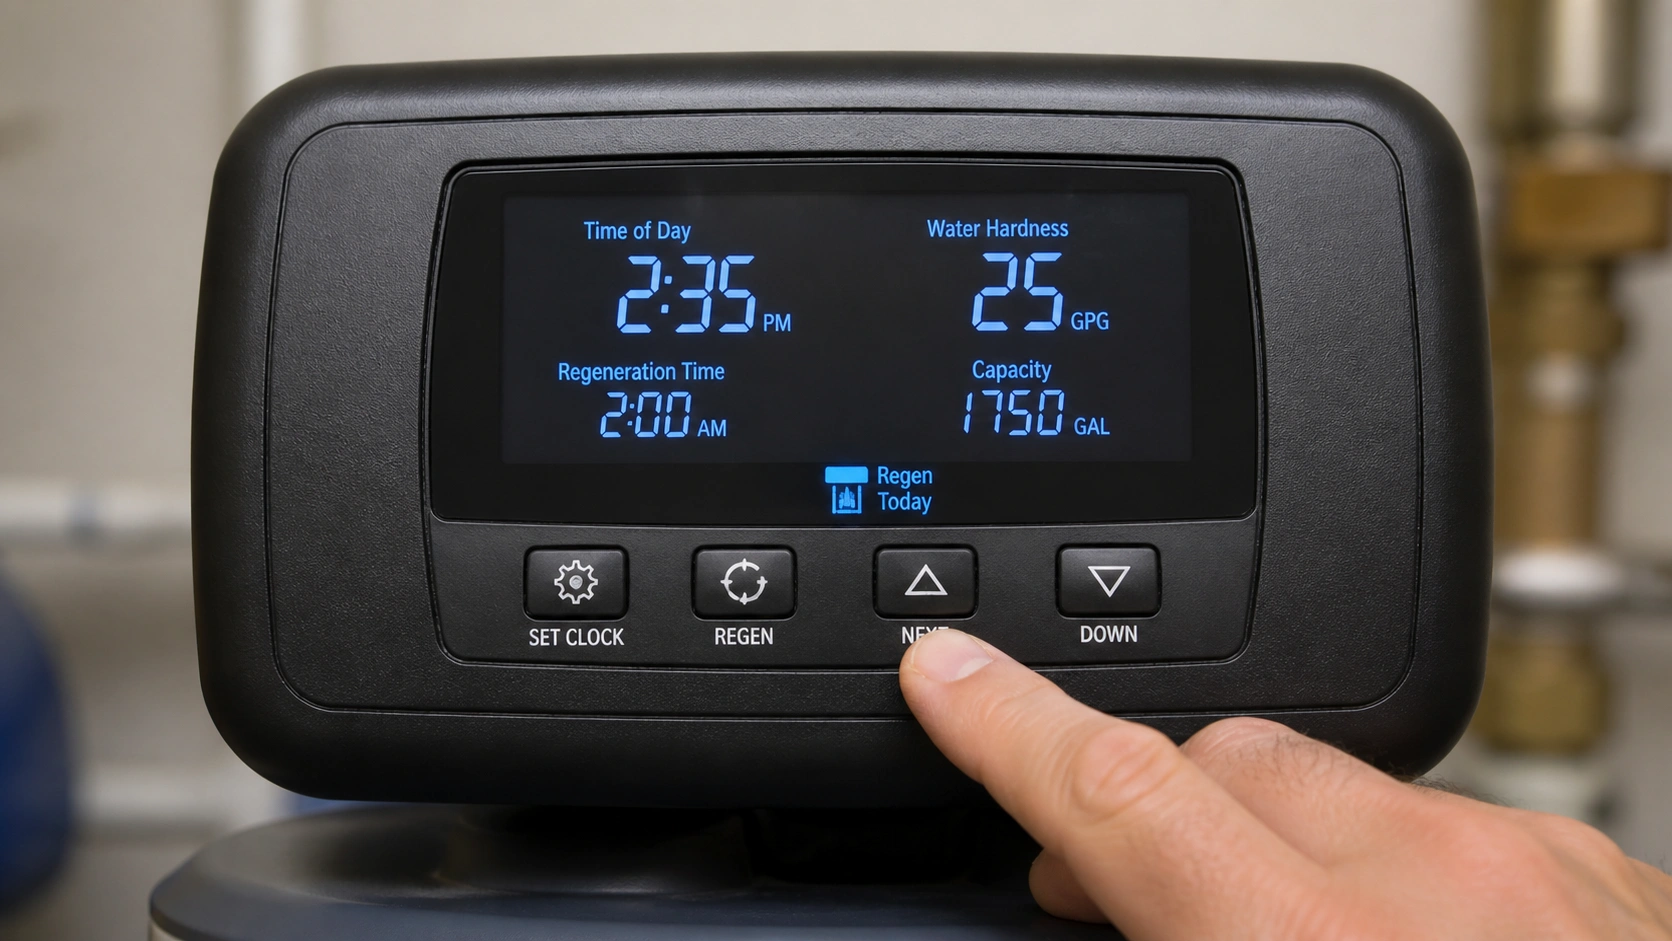
Proper programming of the control panel ensures optimal performance based on your water conditions
Tips & Common Mistakes to Avoid
Installation Tips
- Always use Teflon tape or pipe thread sealant on threaded connections
- Install unions or shutoff valves before and after the softener for future maintenance
- Ensure the unit is perfectly level to prevent uneven wear and performance issues
- Leave adequate space around the unit for maintenance and salt refilling
- Consider installing a sediment filter before the softener if you have sandy water
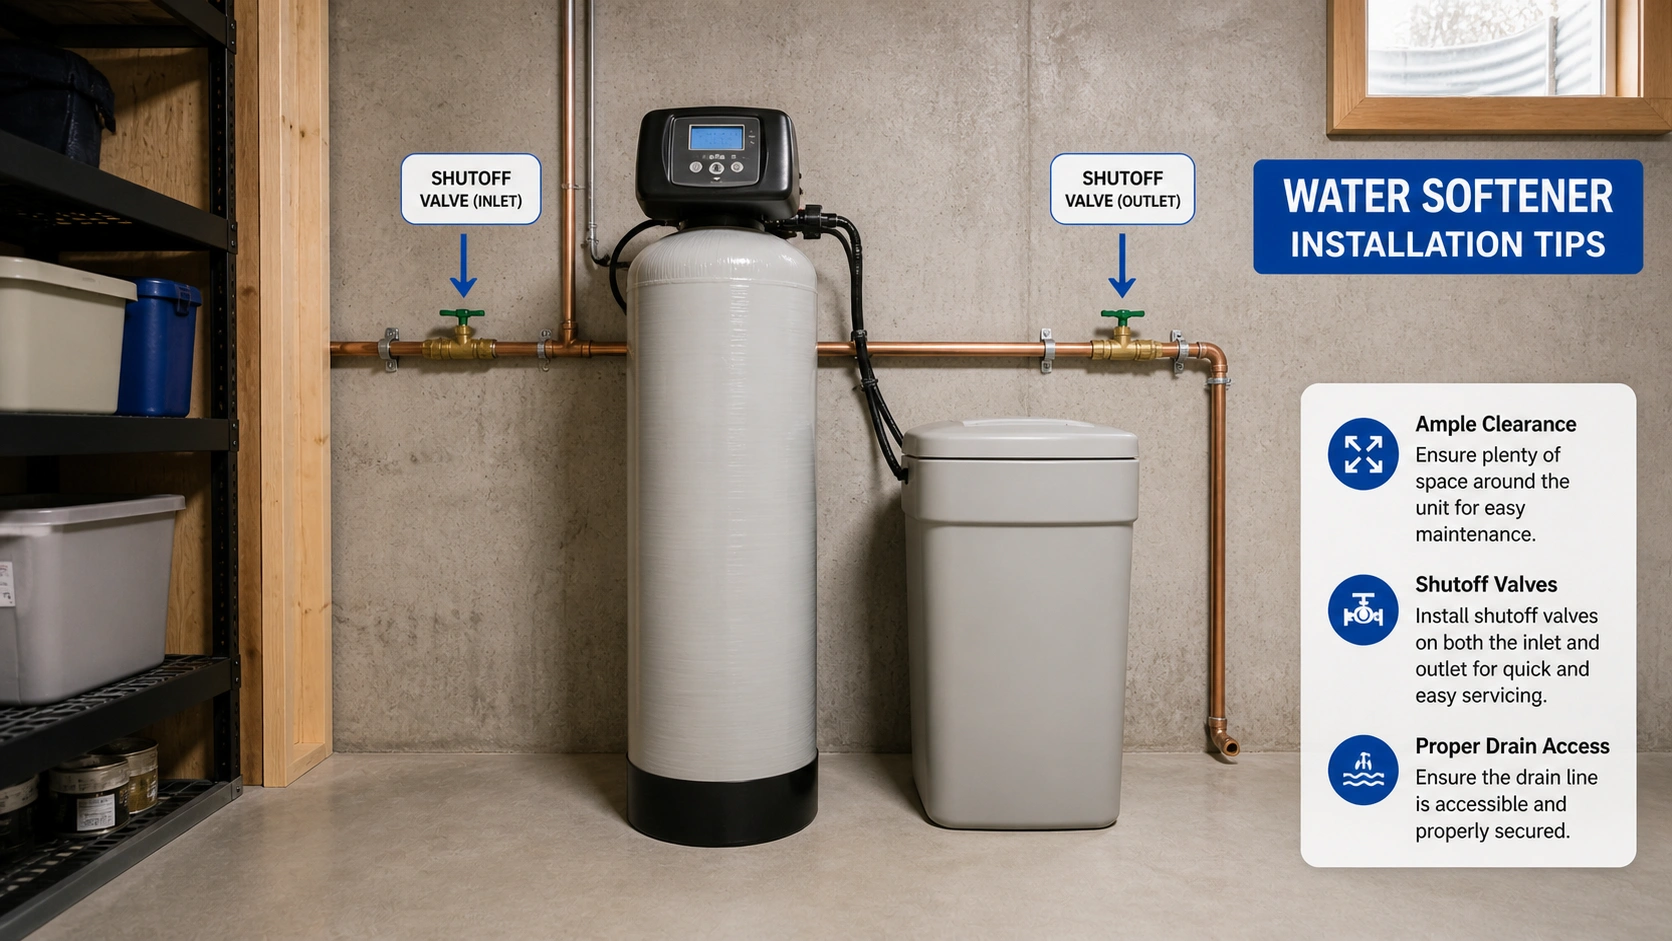
Proper installation includes leaving adequate space around the unit for maintenance access
Common Mistakes
- Failing to provide an air gap for the drain line, creating a cross-connection risk
- Connecting the softener to hot water lines instead of cold water supply
- Installing in areas prone to flooding or without proper ventilation
- Using the wrong type of salt for your specific model
- Not programming the system correctly for your water hardness level
Avoid these common installation mistakes to ensure your water softener operates efficiently
Post-Installation Maintenance
Regular Maintenance Tasks
- Check salt levels monthly and refill as needed
- Inspect for leaks around connections and the drain line
- Clean the brine tank annually to remove salt buildup and sediment
- Test water hardness periodically to ensure proper operation
- Run a cleaning solution through the resin bed every 6-12 months if recommended
Regular salt level checks are essential for consistent water softening performance
Troubleshooting Common Issues
- If water isn't soft, check salt levels, programming, and brine tank operation
- For salt bridges (empty space between salt and water in brine tank), break up with a broom handle
- If system isn't regenerating, check power source and timer settings
- For leaks, tighten connections or replace faulty O-rings or seals
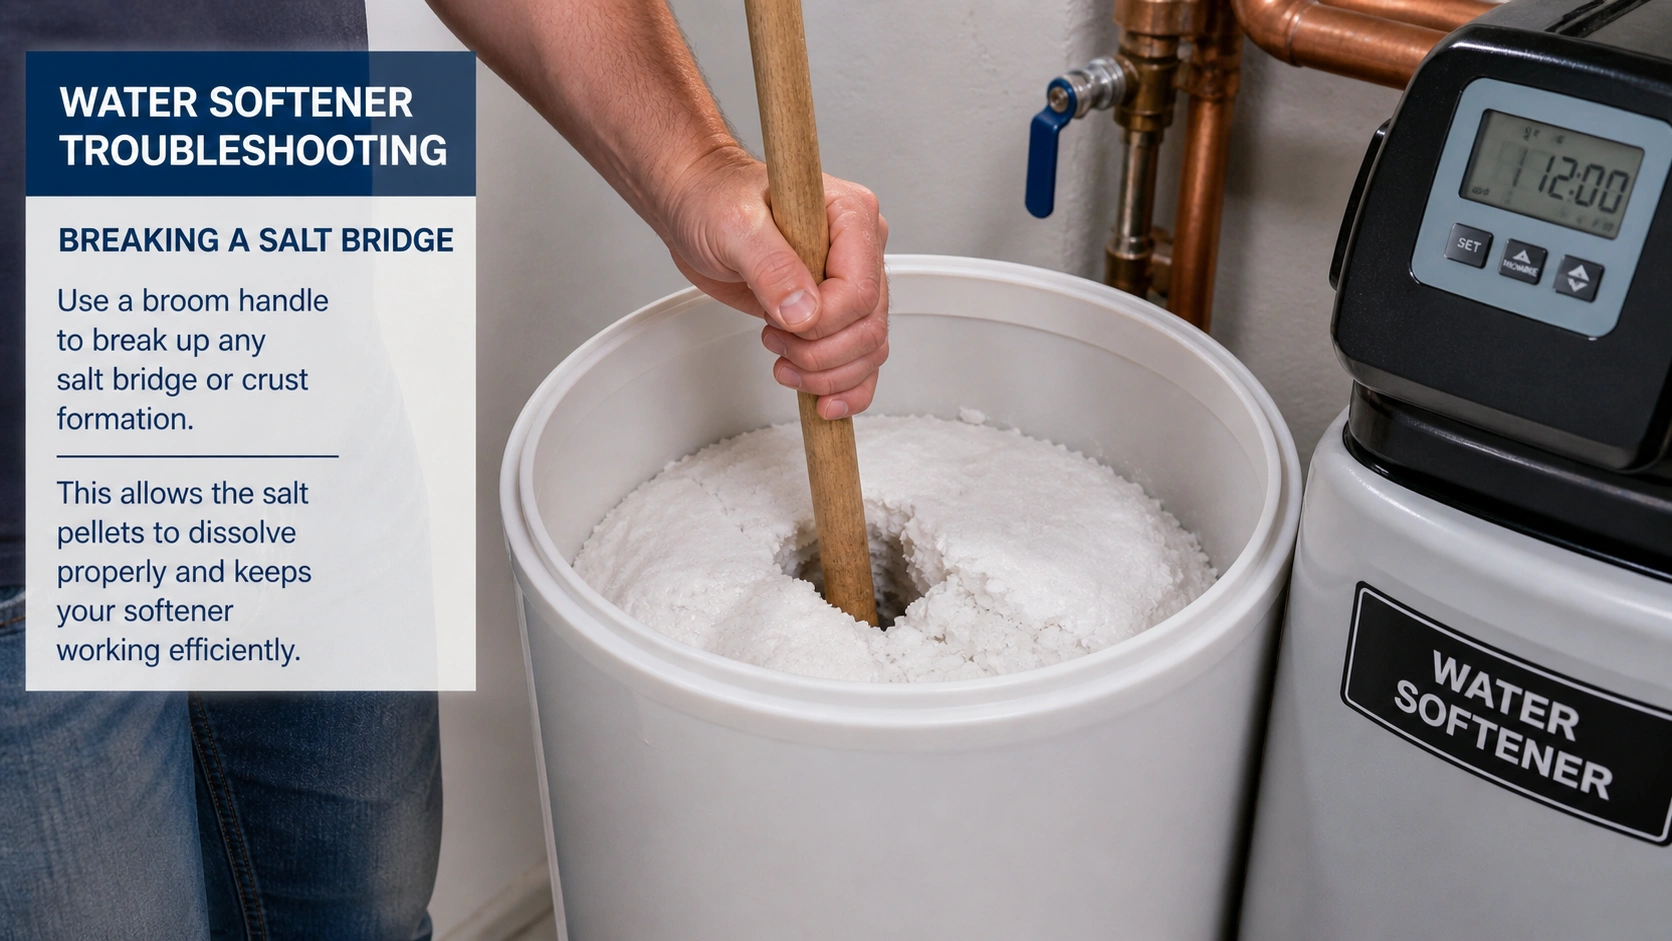
Understanding common water softener issues can help you quickly identify and resolve problems
Frequently Asked Questions (FAQ)
Can I install a water softener myself, or do I need a plumber?
Many homeowners with basic plumbing skills can install a water softener themselves, especially if they have PEX or CPVC plumbing that doesn't require soldering. However, if you're uncomfortable with plumbing work or have complex copper piping, hiring a professional may be advisable.
How long does installation usually take?
A typical water softener installation takes 2-4 hours for someone with basic plumbing experience. First-time installations might take longer, especially if unfamiliar with the process or if modifications to existing plumbing are needed.
Does every water softener require electricity?
No, not all water softeners require electricity. Traditional timer-based models need power to operate the control valve, but some newer non-electric models use water pressure to control the regeneration process. Check your specific model's requirements.
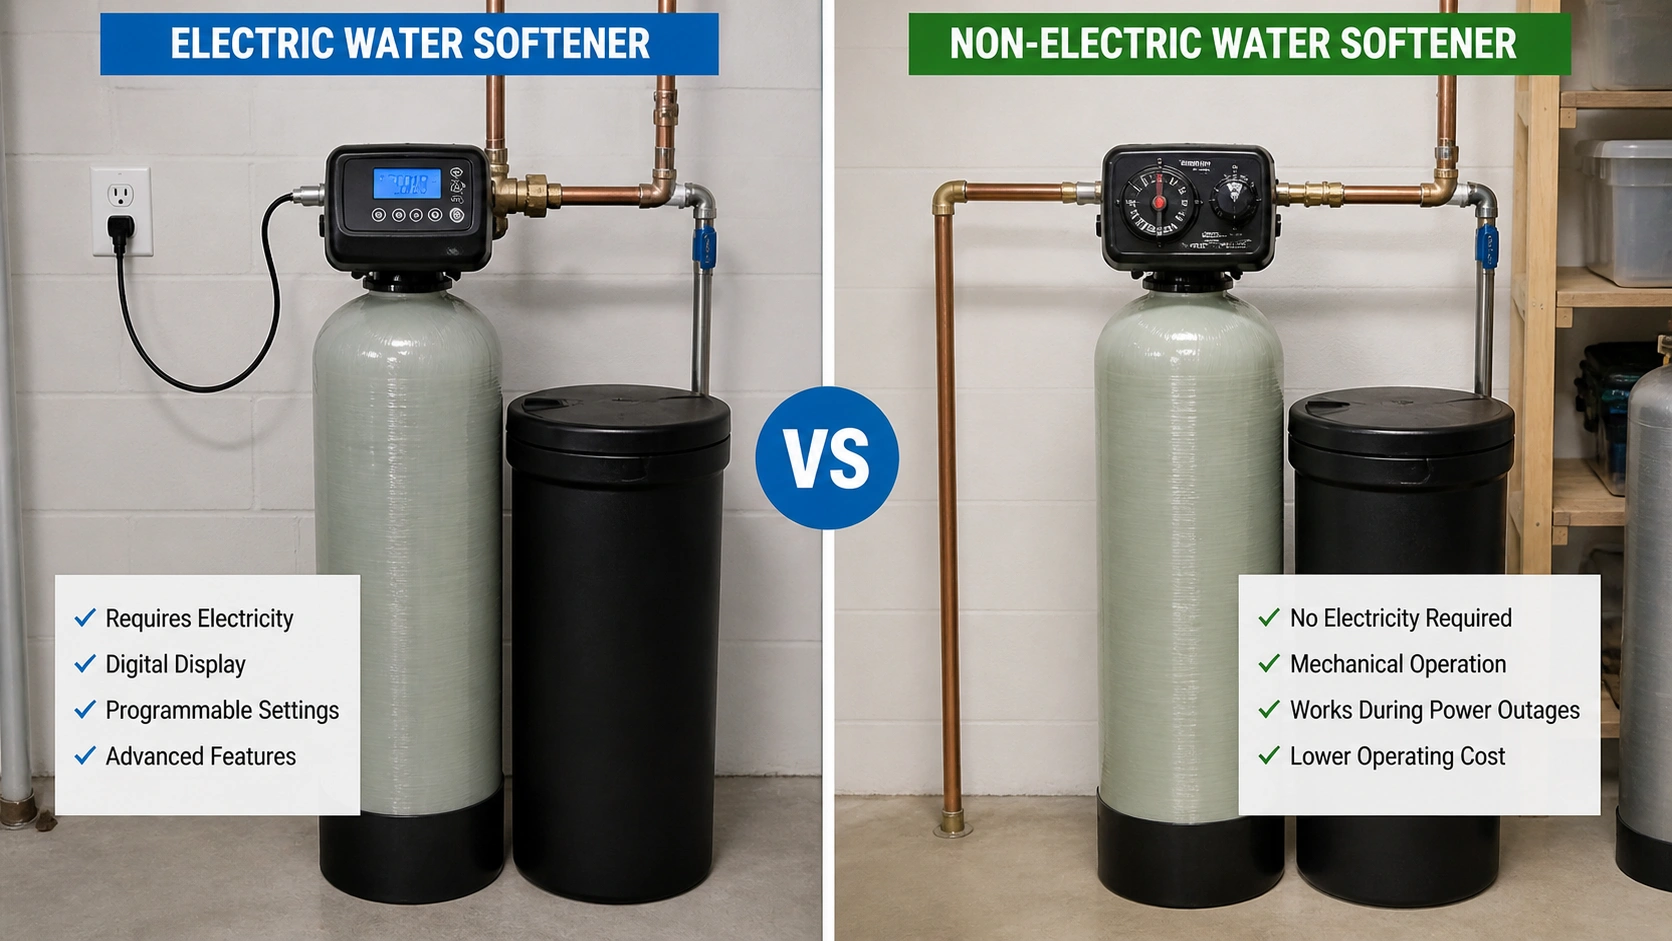
Electric water softeners (left) require power for the control valve, while non-electric models (right) use water pressure
How do I know if my softener is working properly?
Signs your softener is working include: reduced soap scum, softer feeling skin and hair after bathing, less spotting on dishes and fixtures, improved lathering of soap, and regenerating according to its schedule. You can also test water hardness with a test kit.
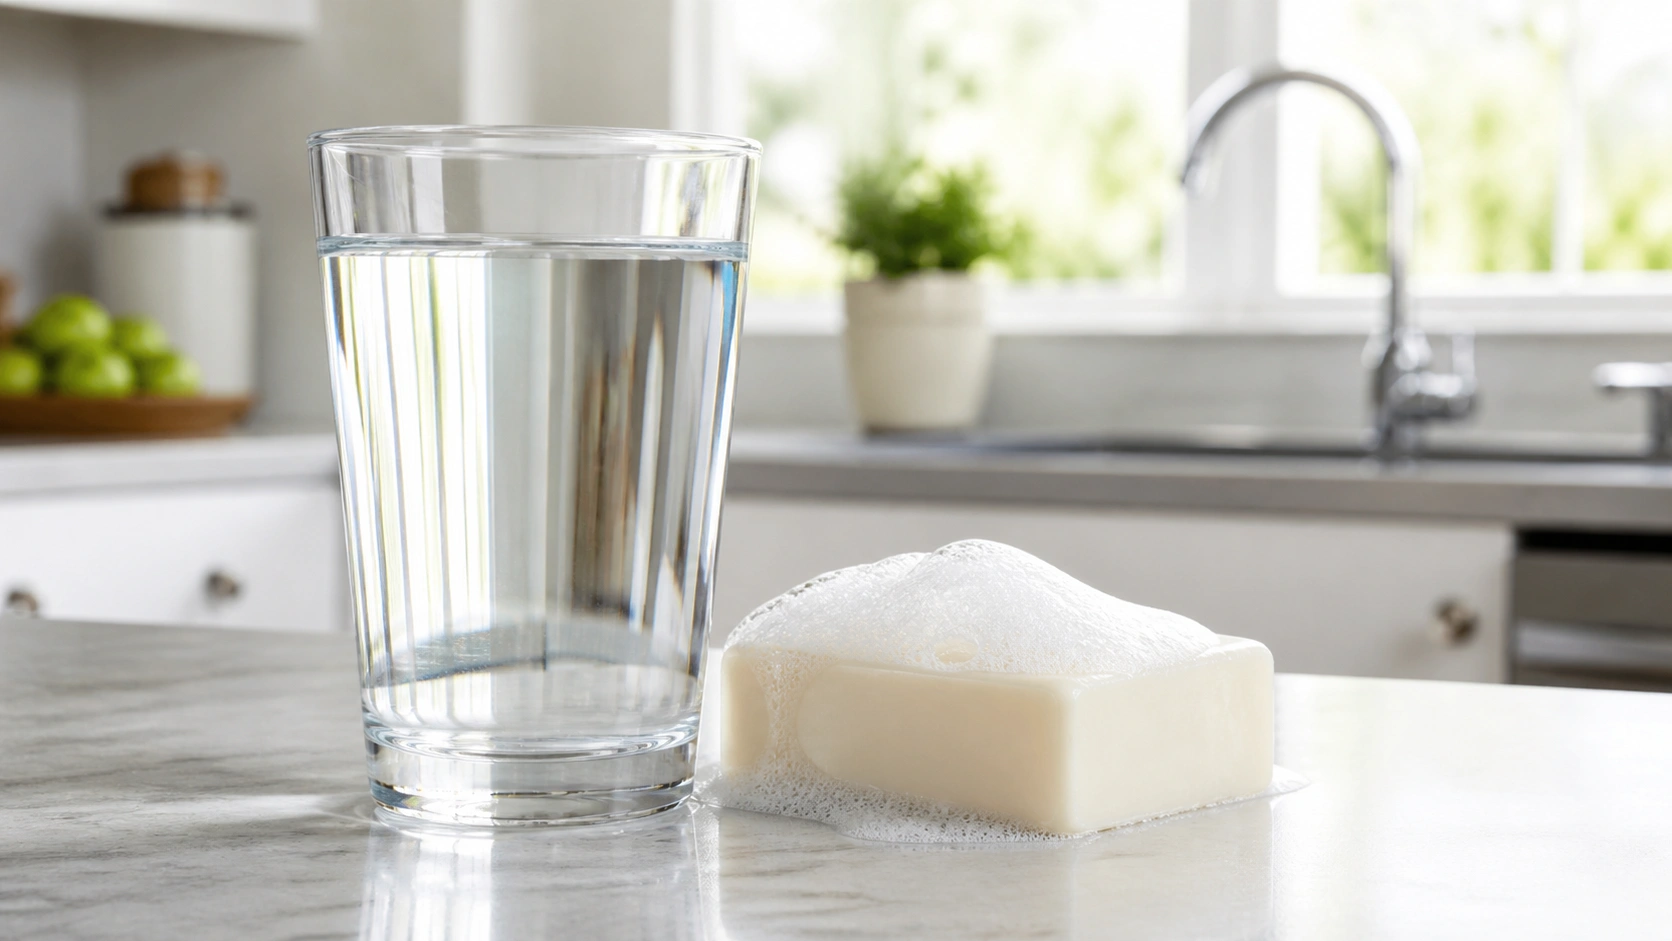
Reduced soap scum, less spotting on dishes, and softer skin are signs your water softener is working properly
Conclusion
Installing a water softener is a worthwhile investment that can protect your plumbing, improve water quality, and make cleaning easier throughout your home. While the installation process requires careful planning and attention to detail, many homeowners can successfully complete it themselves with the right guidance.
Remember that proper maintenance is key to keeping your water softener operating efficiently for years to come. Regular checks of salt levels, occasional cleaning of the brine tank, and periodic testing of water hardness will ensure your system continues to provide the benefits of soft water.
If you encounter challenges during installation or are uncomfortable with any aspect of the process, don't hesitate to consult a professional plumber. The initial investment in proper installation will pay dividends in the long-term performance and reliability of your water softening system.
A properly installed and maintained water softener will provide years of soft water benefits
Recommended Water Softeners
Other Water Softener Products
Explore these additional water softening solutions for different needs and applications:
Culligan Water Softener Systems
Trusted brand offering a range of efficient water softening solutions with advanced filtration technology and reliable performance for whole-house water treatment.
Water Softener Salt Products
High-quality salt options including pellets, crystals, and blocks specifically formulated for optimal performance in various water softening systems.
Complete Water Softener Systems
Comprehensive water softening solutions including all necessary components for whole-house installation with various capacity options for different household sizes.
AO Smith Water Softeners
Efficient and reliable water softening systems from a reputable manufacturer known for quality water treatment products and innovative technology.
Fleck Water Softener Systems
Industry-leading water softeners known for their durable construction, precision control valves, and efficient operation for residential and commercial applications.
Water Softener Filter Components
Replacement filters and filtration accessories designed to maintain optimal water softener performance and extend the life of your water treatment system.